What is a RAG Solution?
A RAG (Retrieval-Augmented Generation) system combines two powerful capabilities:
- Retriever: Locates and fetches relevant data from your documents or database.
- Generator: Uses AI (like GPT models) to generate accurate and conversational responses based on the retrieved data.
This approach makes RAG ideal for tasks like customer support, knowledge management, or content summarization.
Adding just a bit more background, to use Retriever, you need to have storage for your knowledge in the first place. Knowledge is stored in a very specific form as so-called embeddings, usually in a specialized type of database called vector database.
What are embeddings?
📌 Definition:
Embeddings are numerical vector representations of text that capture its semantic meaning. They allow similar texts to have comparable vector values in high-dimensional space.
💡 Example:
Texts like "I love dogs" and "I adore puppies" will have similar embedding vectors, even though they use different words.
⚙️ How They’re Created:
- Text is processed through embedding models (e.g., OpenAI's text-embedding-ada-002).
- The model converts the text into a vector of floating-point numbers.
📂 Where They’re Stored:
- Embedding vectors are stored in vector databases.
- These databases specialize in similarity search, enabling quick retrieval of the most relevant embeddings for a query.
With Azure AI Studio’s web app, you can easily integrate all the above-mentioned components without any coding knowledge to quickly build and deploy a RAG solution.
What You’ll Need
- An Azure subscription with access to the Azure OpenAI Service.
- Your data (e.g., FAQs, manuals, PDFs, or text files).
- Approximately 3 hours of time.
Step 1: Upload Files to Azure Blob Storage
- Log in to Azure Portal and navigate to your Blob Storage account.
- Create a container to store your files.some text
- Set the container access level to private for security.
- Upload files in the following formats to your Blob Storage:
.txt, .md, .html, .docx, .pptx, .pdf
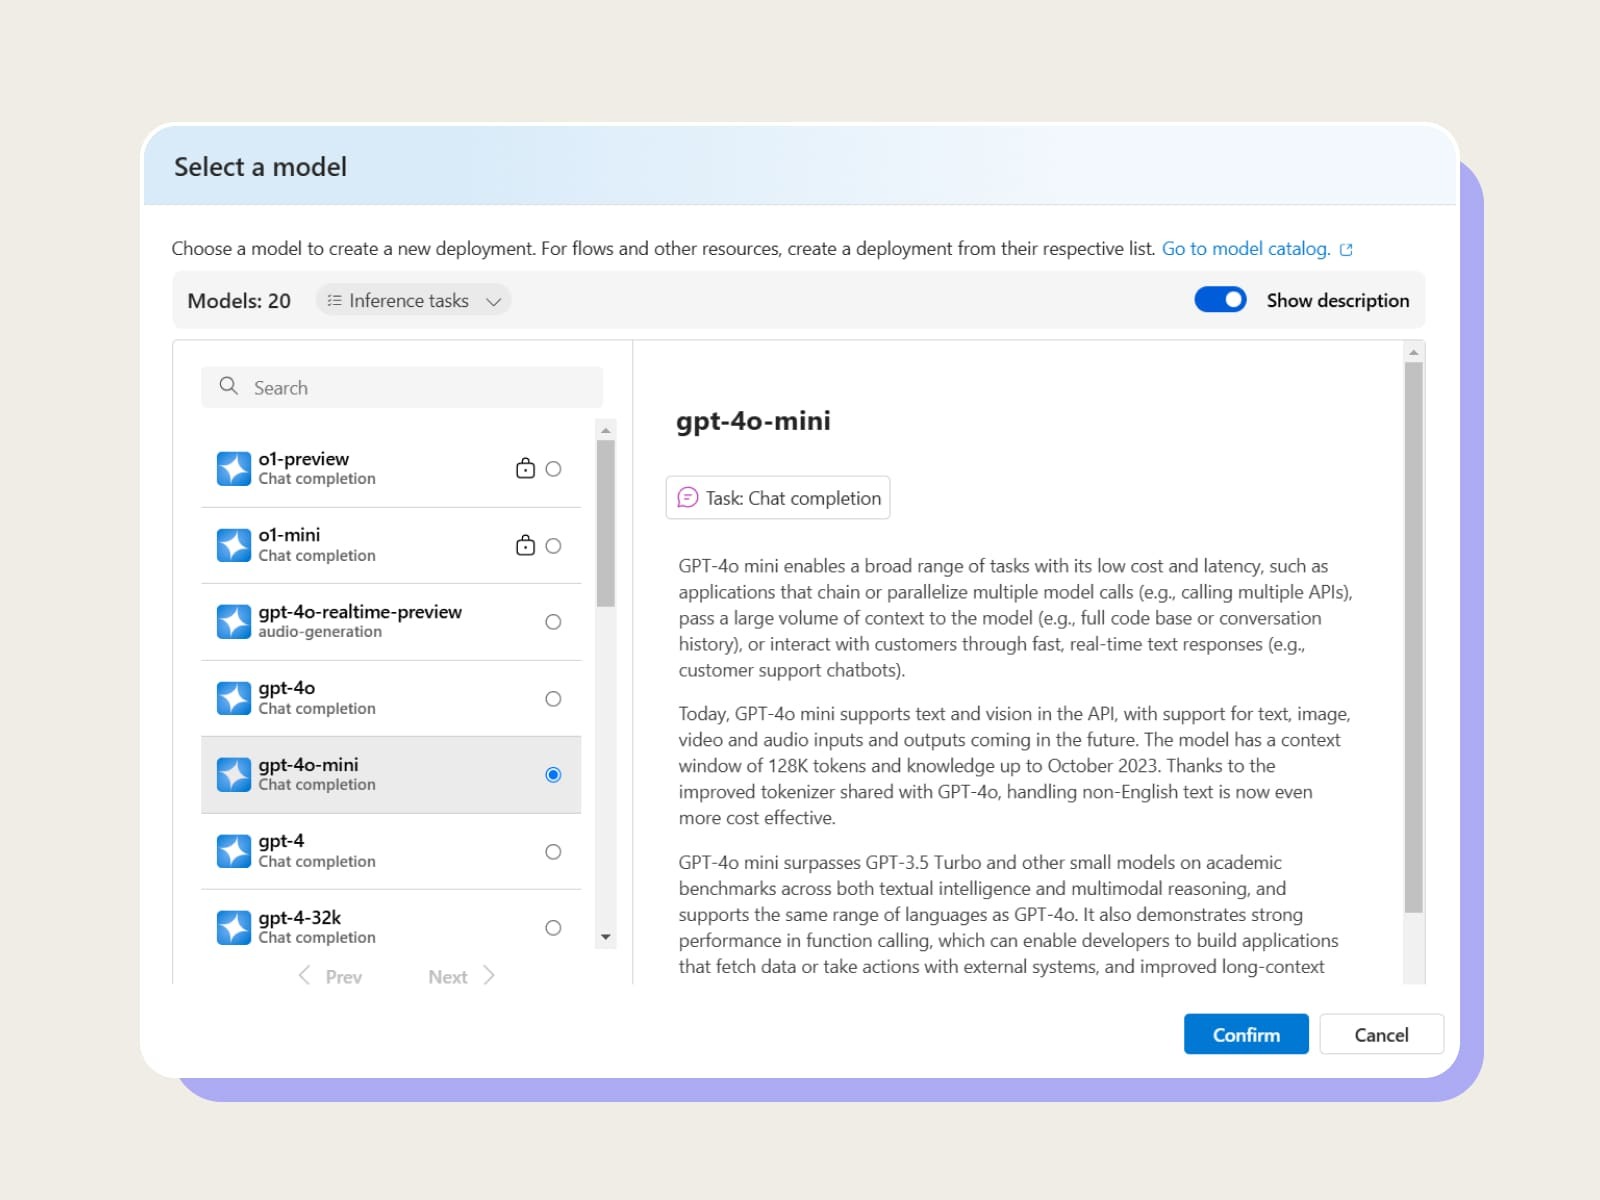
Step 2: Deploy the Models
- Go to your Azure OpenAI resource in the Azure Portal.
- Click on Deployments and then Create New Deployment.
- Choose the text-embedding-ada-002 model.some text
- Provide a name for the deployment (e.g., ada-embedding).
- Click Create to deploy the model.
- Create a new deployment for GPT-4-0 Mini:some text
- Choose the gpt-4o-mini model.
- Provide a deployment name (e.g., gpt4-mini).
- We suggest to have at least 200k tokens per minute quota to prevent the rate limit error.
- Click Create to finalize the deployment.

Step 3: Configure Azure AI Search with Ada
- Open the chat option in Azure AI Studio and select the gpt-4o-mini model
- Click on add your data
Select Data Source:
- Choose Azure Blob Storage (preview) as your data source, since your files are stored in Azure Blob Storage.
Subscription:
- From the dropdown, select the Azure subscription that contains your Blob Storage and AI Search resources.
Select Azure Blob Storage Resource:
- Choose the Blob Storage account where your files are stored. If you don’t see it, make sure the storage account is already set up.
Select Storage Container:
- Pick the container in the selected Blob Storage account that holds your files.
Select Azure AI Search Resource:
- Choose an existing Azure AI Search resource from the dropdown.
- If you don’t have one, click Create a new Azure AI Search resource and follow the prompts to set it up.
What is Azure AI Search?
🔍 Definition:
Azure AI Search is a cloud-based search service that uses artificial intelligence to provide advanced search capabilities, including semantic understanding and natural language processing (NLP).
💡 Key Features:
- Full-Text Search: Enables powerful keyword-based searching across structured and unstructured data.
- Semantic Search: Understands intent and context, delivering results that match the meaning of a query, not just the words.
- Vector Search: Leverages embeddings to find semantically similar results in high-dimensional space.
- Hybrid + Semantic Search: Combines traditional vector search with semantic, ensuring relevance both by keyword matches and deeper contextual understanding.
⚙️ How It Works:
- Data Sources: Ingest data from Blob Storage, SQL databases, SharePoint, and more.
- AI Capabilities: Enhance results with AI features like OCR (optical character recognition), text analytics, and embeddings.
- Indexing: Automatically chunk and process data into a searchable format.
📂 Where It’s Used:
- Enterprise knowledge bases.
- E-commerce platforms for product search.
- Customer support for FAQ and document retrieval.
Enter the Index Name:
- Type a unique name for the index (e.g., documents-index) that Azure will create. This index organizes your files for searching.
Indexer Schedule:
- Select how often the indexer should process your files.
- Choose Once if you only need the files indexed now. You can adjust this later for automatic updates.
Add Vector Search to This Search Resource:
- Ensure this box is checked to enable vector search, which allows advanced AI-based searches.
Select an Embedding Model:
- From the dropdown, choose ada to use this model for creating embeddings that improve search accuracy.
- Click Next
- Select Hybrid + semantic search
- Click Next
- Select Api Key or System managed identity
- Click Next and Save
.jpeg)
Step 4: Index Data in Azure AI Search
- Azure OpenAI On Your Data automatically integrates with Azure AI Search to index uploaded data.
- During the data ingestion process:some text
- Files are chunked into manageable pieces.
- Embedded into the Azure AI Search index for optimized retrieval.
- If needed, customize the index by mapping fields to specific roles (e.g., Content, Title).
Step 5: Customize Responses
- Define a System Message in Azure OpenAI Studio to steer responses:some text
- Specify the role, dataset characteristics, and language of responses.
- Example: "You are an assistant that answers customer support queries using the uploaded documents."
- Adjust the response format based on the application's requirements.
- You can also adjust other parameters, such as strictness and number of received documents.
Step 6: Deploy Your Application
Once your data is ingested and indexed:
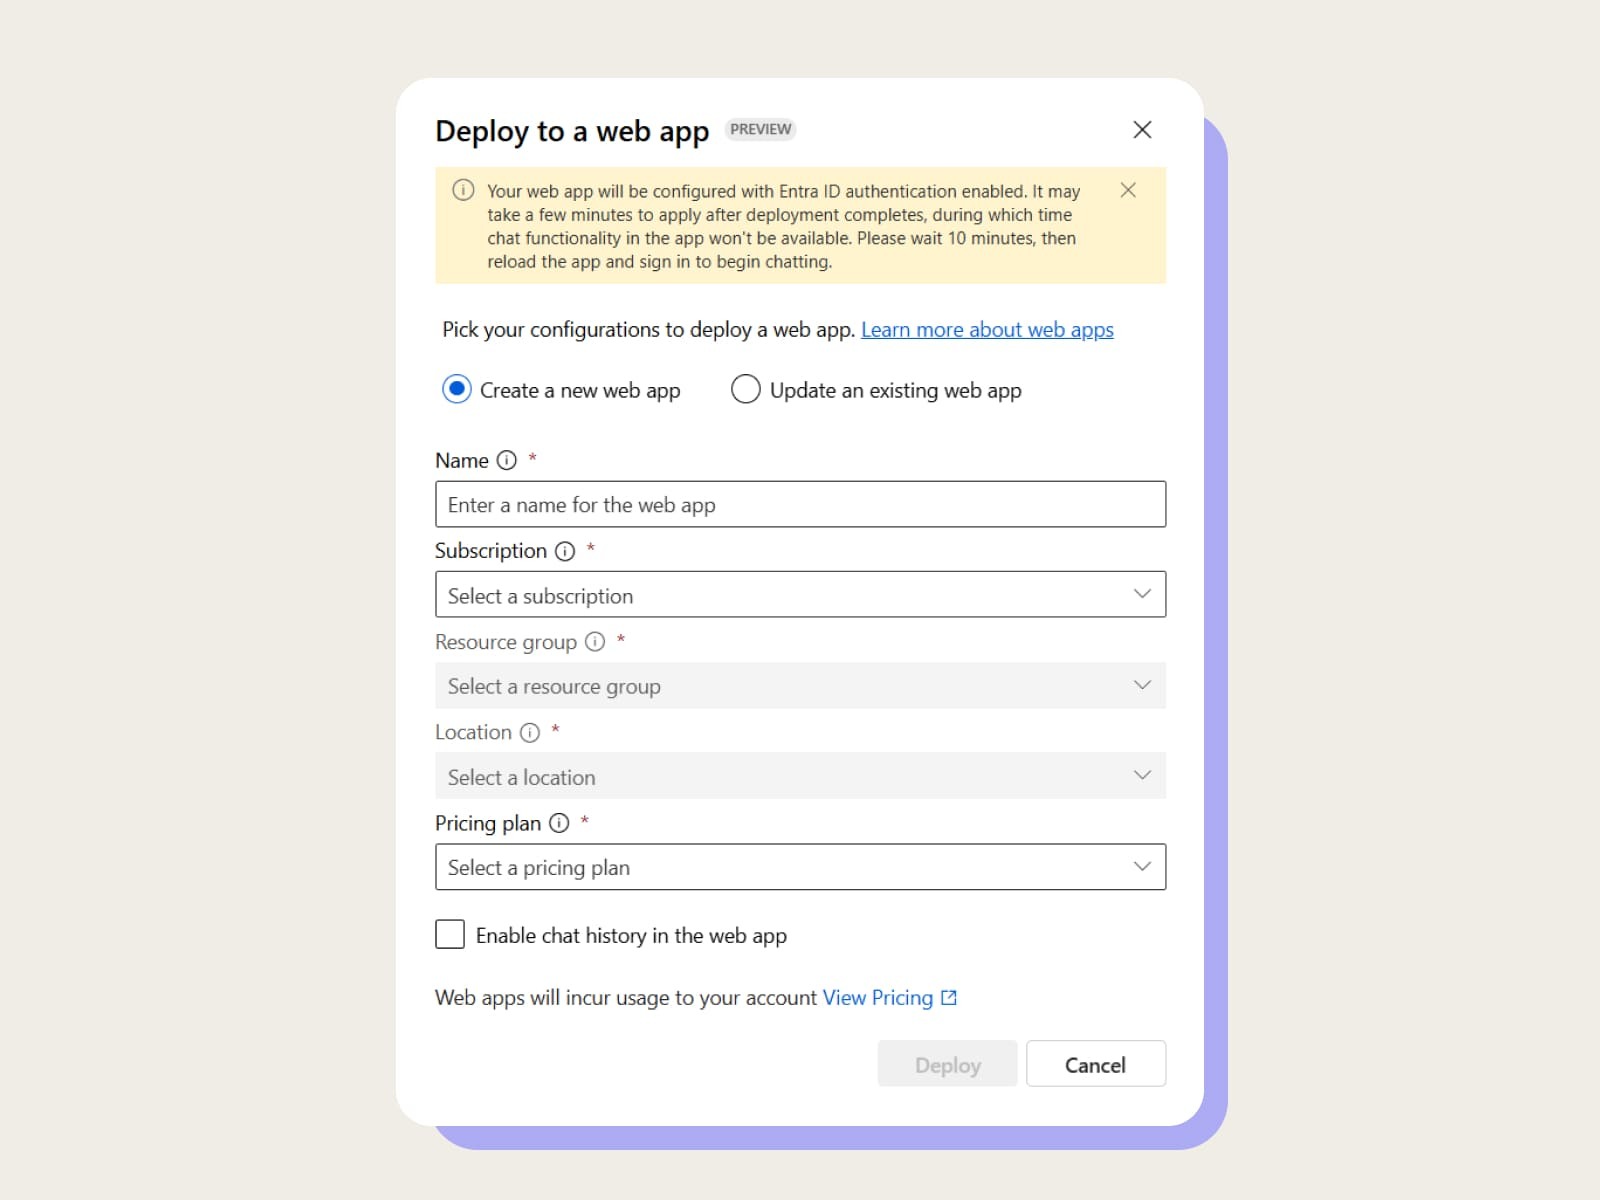
- In Azure OpenAI Studio, go to the Deploy to section.
- Choose from the following deployment options:some text
- Web App: Interact with your model via a web interface.
- Teams App (Preview): Use within Microsoft Teams.
- Copilot (Preview): Create a personalized assistant for your use case.
- Here you Should type the name of the app, subscription, resource group, location and desired pricing plan. You can also enable chat history.
- Wait for 10-20 minutes for app to be deployed.

Result:
You should see a working RAG implementation that will answer your questions based on the documents you provided in step 1.
.jpeg)
Real-World Use Cases for RAG Solutions:
Customer Support
Automate FAQ handling by enabling users to query documentation and receive concise, accurate answers.
Internal Knowledge Management
Empower employees to retrieve insights from policy documents, training materials, or technical manuals.
Educational Tools
Help students and teachers find relevant information in e-books, research papers, and course materials.
Why Use Azure AI Studio’s Web App for RAG?
- No Coding Required: Build, test, and deploy an AI-powered assistant without any programming.
- Rapid Deployment: Create a solution in hours, not weeks.
- Scalable and Secure: Rely on Azure’s robust infrastructure to handle your data and traffic.
- Customizable: Tailor the assistant’s tone, behavior, and capabilities to meet specific needs.
Conclusion
Building a Retrieval-Augmented Generation (RAG) solution has never been easier. Azure AI Studio’s web app feature empowers you to harness the power of generative AI and document retrieval, all without writing a single line of code.
In just 3 hours, you can create a smart assistant that transforms how users interact with your data. Whether for customer support, knowledge management, or education, the possibilities are endless.
Ready to get started? Head over to Azure OpenAI Studio and build your first RAG solution today!


